
Orico M2PV-C3 NVMe to USB3 Type-C Enclosure Review
The magic of USB drive adapters is that they’re both a service tool for data recovery and a cheap way to turn an old drive into a portable backup, but until recently these have tended to be very slow: The old USB 3.0 interface eventually got renamed USB 3.2 Gen1 but kept its decade-old 5Gb/s transfer speeds. Realtek’s low-cost RT9210 changed all that, but it wasn’t until low-cost brands started selling these things that one of these got our attention.
| Orico M2PV-C3 | |
| Type | Portable Drive Enclosure |
| Form Factor | M.2 (up to 2280) |
| Internal Interface | NVMe (PCIe 3.0 x2) |
| External Interface | USB3.2 Gen2 (10Gb/s) |
| Dimensions | 108x30x14mm |
| Weight | 46g |
| Warranty | One-year |
Get it at Amazon

(click for availability)
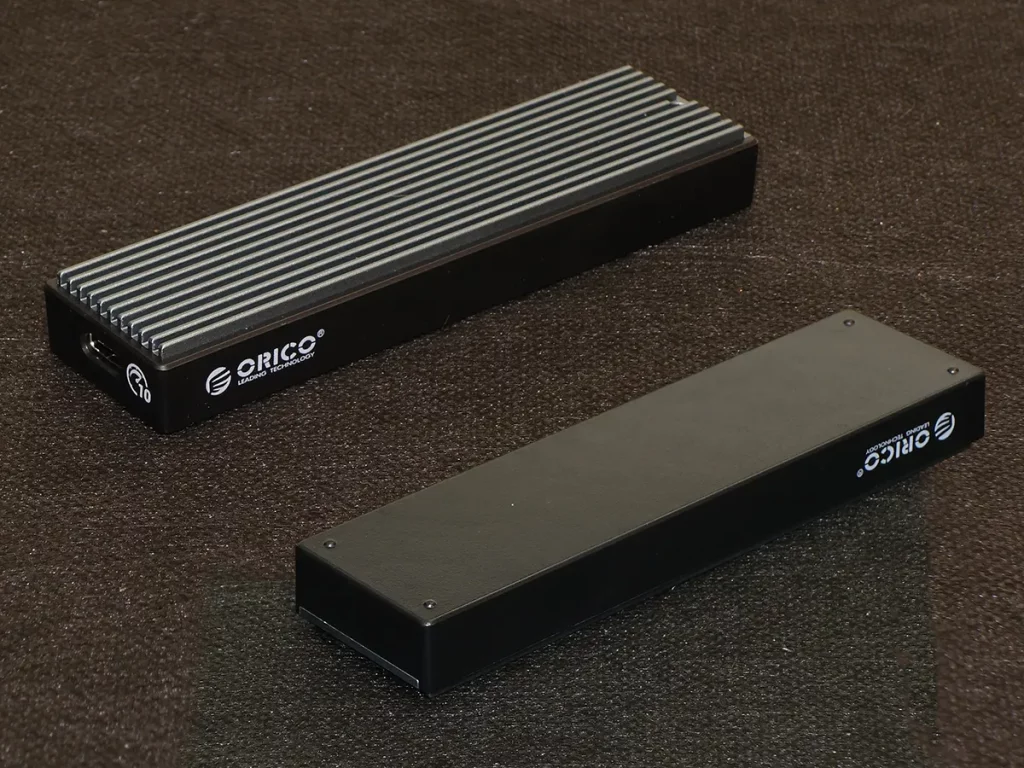
Topped with an aluminum heat sink and loaded with said controller, Orico’s M2PV-C3 comes packed with a thermal pad to fill the gap between your SSD and the enclosure’s heat-sink lid, installation instructions in both Chinese and English, a spare screw, two rubber pin spacers, a Torx driver, a Type-C to Type-C USB cable, and a Type-C to Type A USB cable. Both cables are compliant with Gen2 transfer speeds.

The rest of the M2PV-C3 enclosure is plastic, and removing its aluminum lid exposes a circuit board that, as you might expect, has its NVMe slot facing that aluminum heat sink lid. Removing the board and flipping it reveals its controller IC (integrated circuit, ie “chip”).


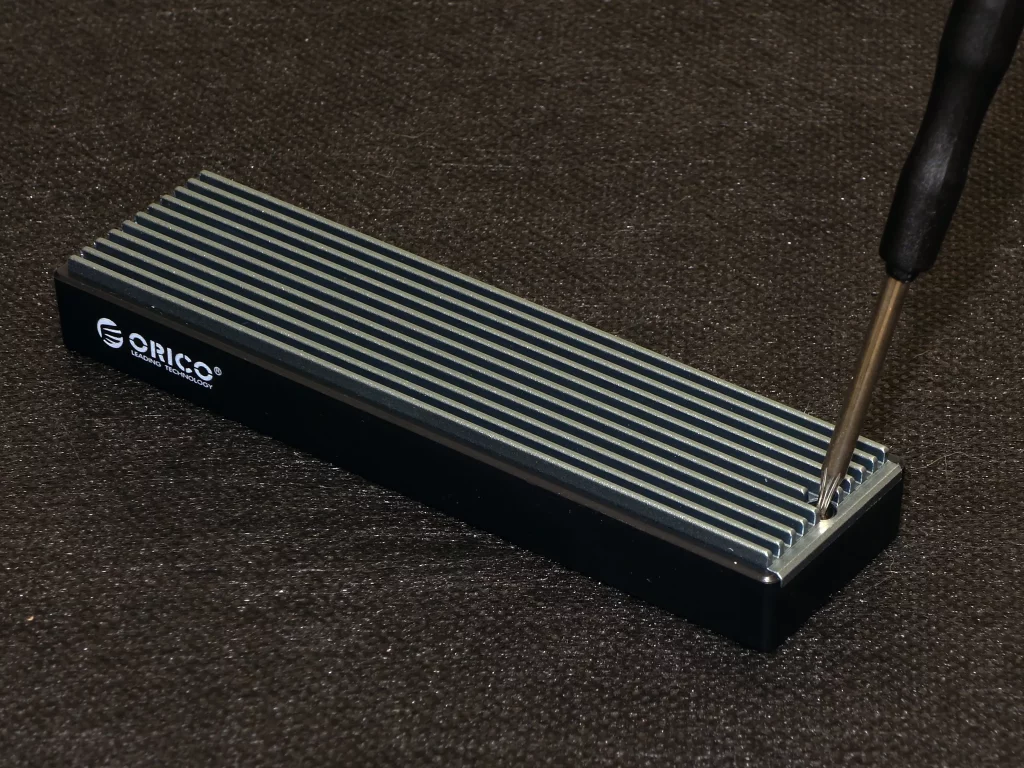
It’s at this point where we noticed that the printed instructions relied on tiny photographs that were too small and grainy to be useful, for example “Turn knob to fix it” where there was no visual indication of what the company was referring to as a “knob”. And so it begins!
You probably figured out that the Torx driver was included for removing the Torx head screw from the cover, but you may not have known why the company included a second screw: It’s a spare.
The “knob” is actually the top of a rubber pin, of which the company includes two (one spare). It fits into the screw notch at the end of your M.2 drive.

The small knub on the end of the rubber pin fits into the interface card. We’re guessing that you could twist it in place if you could actually grab the thing, but with a head this small we simply pushed hard and twisted a thumb against it, hoping for the best. That worked, the second time.

Note the circled close-ups: If you’ve removed the card, you should reinstall it by tilting it in at an approximate 45° angle until the USB Type-C port reaches its access hole, then drop it into place paying close attention to the two alignment tabs. Then add the included thermal pad by peeling its protective plastic from one side and sticking it carefully over the drive’s ICs as shown.
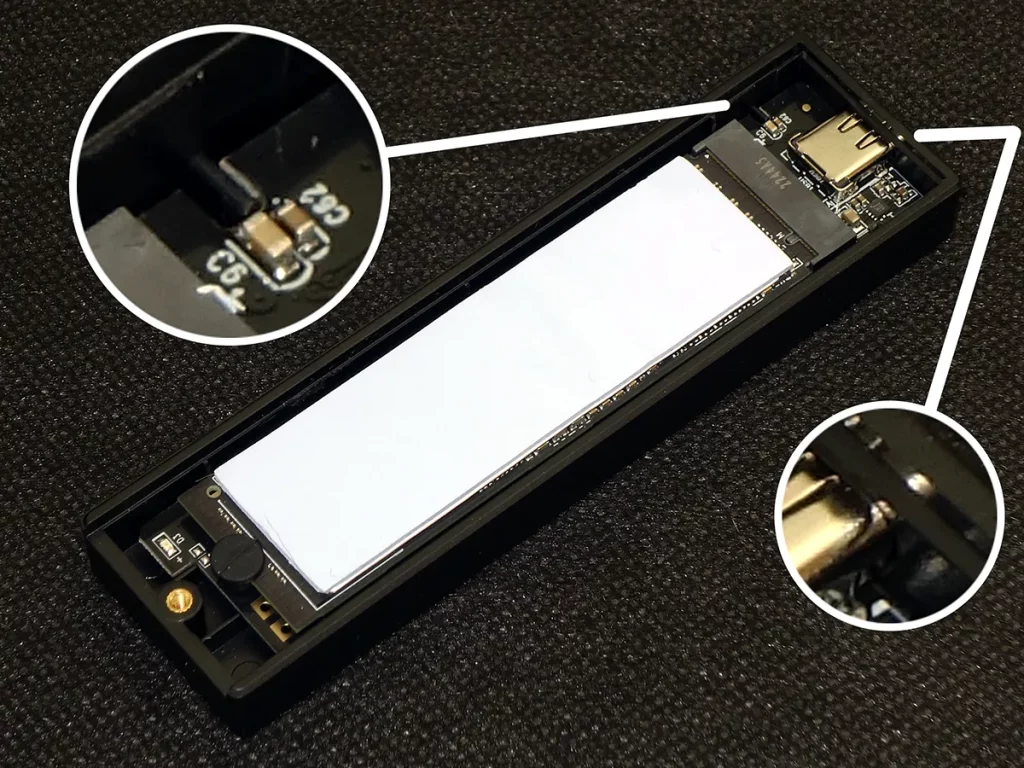
Peeling the other plastic sheet allows it to make good thermal contact with the lid. While one end of the lid has a screw hole, the other has a lip that fits into a grove on the enclosure body that’s located just above its Type-C port: Tilt the lid slightly to fit its lip into the grove, lower it over the drive, and reinstall the screw to complete assembly.
| Test Hardware | |
| CPU | Intel Core i9-13900K: 24C/32T, 3.0-5.8 GHz, 36 MB L3 Cache, LGA 1700 |
| CPU Cooler | Alphacool Eisblock XPX CPU, VPP655 with Eisbecher D5 150mm, NexXxoS UT60 X-Flow |
| Motherboard | ASRock Z790 Taichi Carrara: LGA-1700, BIOS 7.04 (05-25-2023) |
| Graphics | Powercolor Red Devil Radeon 6750 XT: 2324-2623MHz GPU, 12GB GDDR6 |
| Power | be quiet! Dark Power Pro 10 850W: ATX12V v2.3, EPS12V, 80 PLUS Platinum |
| Memory | Patriot Viper Venom RGB DDR5-6200 2x16GB (32GB) CL40-40-40-76 1.35V |
| System Drive | Sabrent Rocket 4 Plus 2TB PCIe 4.0 M.2 SSD |
| Test Drive | T-Force Cardea A440 Pro 2TB PCIe 4.0 M.2 SSD |
| Sound | Integrated HD Audio |
| Network | Integrated Wi-Fi |
| Graphics Driver | AMD Adrenalin Edition 2022.10.1 |
Since our Z790 Taichi Carrara test build was still in place from our recent review and had all the correct interfaces, we decided to use it. But did you notice that the USB 3.2 ports on the far right are labeled “SS10 (10Gbps)? That’s because they’re Gen2 ports, offering the same bandwidth as a single-link Type-C header.

Unfortunately, not all ports are created equally: Notice the more convoluted pathway from the chipset to the Orico adapter’s RTL9210 on the right side of the image below? That’s how its rear Type-C ports are connected through its Thunderbolt 4 / USB4 controller.
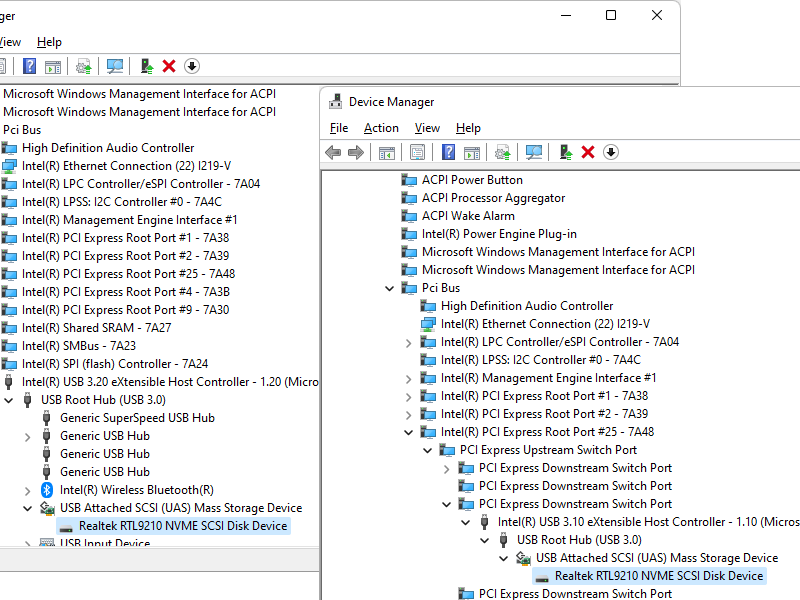
If you think that the pathway shown on the left, above, would have less latency, you’ll understand why today’s evaluation uses both of the Orico M2PV-C3’s cables to test its performance twice, thereby comparing the performance of its Type A Gen2 and Type-C Gen2x2 pathways.
Benchmark Results
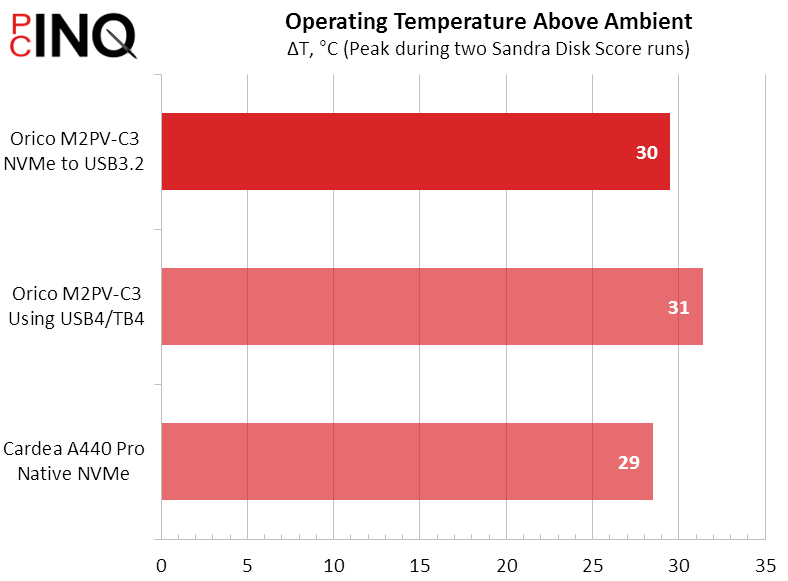
We wanted to examine the effectiveness of the M2PV-C3’s lid as a heat sink, and found that it’s only one to three degrees worse than the heat spreader that came with our board. It’s cool enough that it should let our Cardea A440 Pro run at full speed at ambient temperatures up to around 40°.
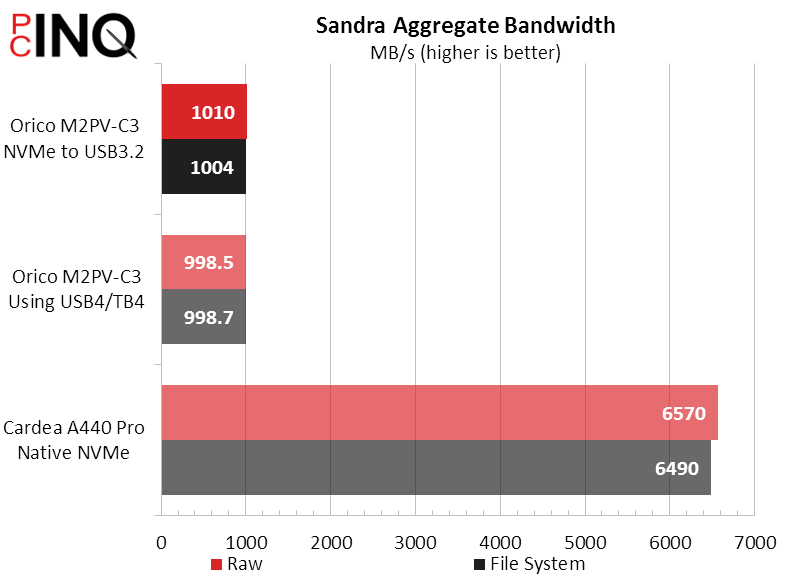
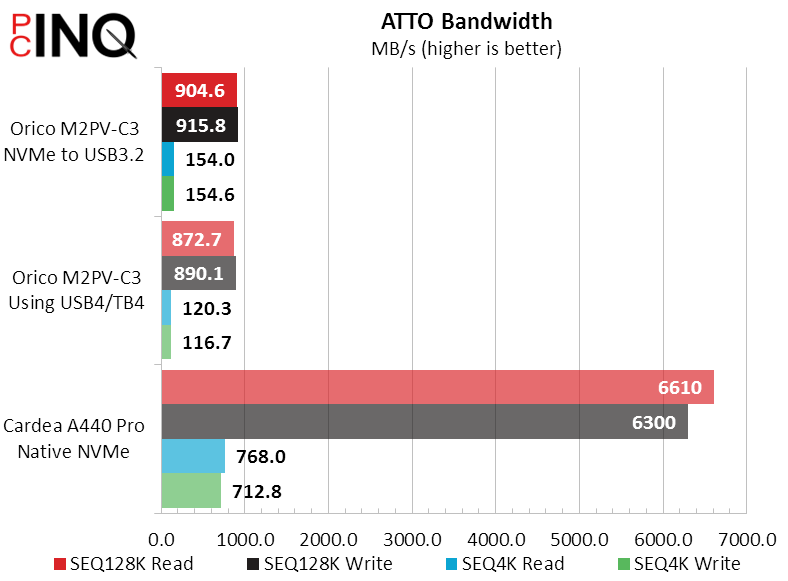
Orico’s M2PV-C3 proves that it’s a performance champion in its first test! Readers confused by those words should consider what 1010 MB/s represents: Multiply by eight to go from bytes to bits and move the decimal place over, and you’ll find that this represents 8.08 Gb/s on a USB interface that has a theoretical limit of 10Gb/s. Living within the limits of USB, Orico’s enclosure at least keeps our drive as fast as the self-proclaimed worlds-fastest USB drive.
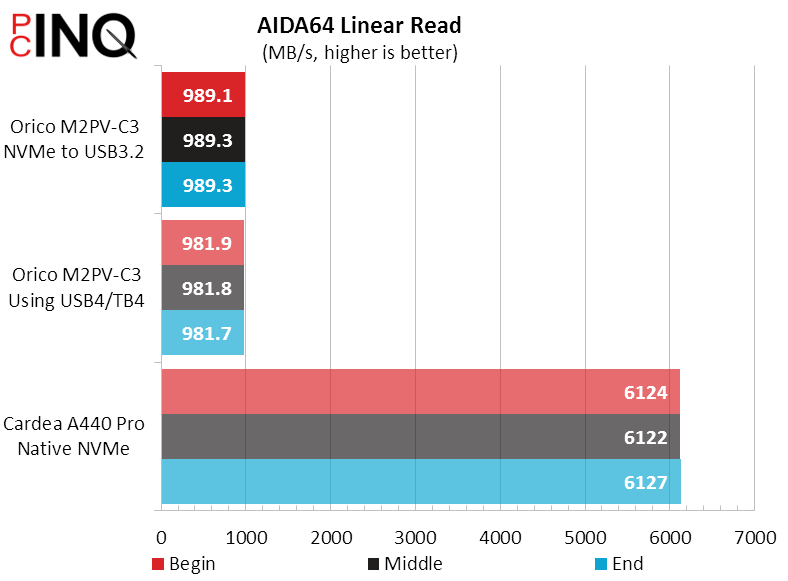
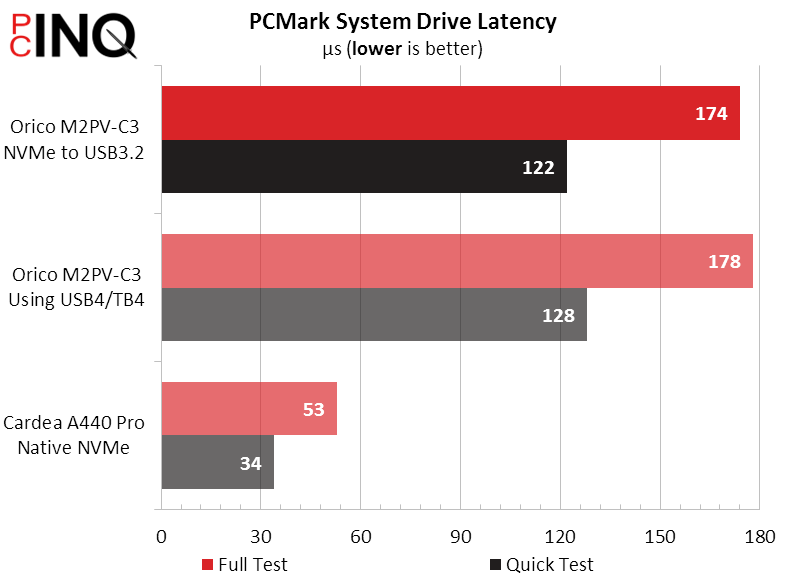
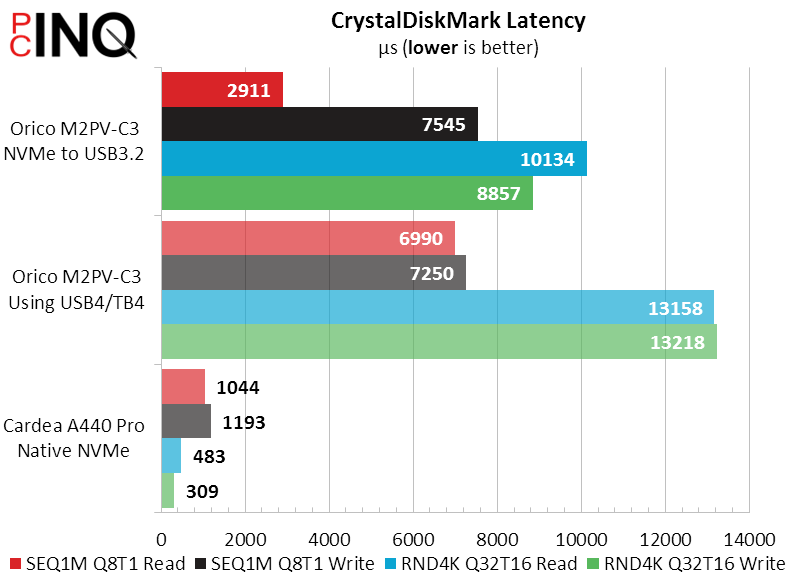
Even the lower numbers of Aida64 hold there own against the numbers quoted by the so-called world’s fastest drive. Slowed only by the USB interface, latency appears to be a far greater reason not to use a USB drive for anything beyond portable storage.


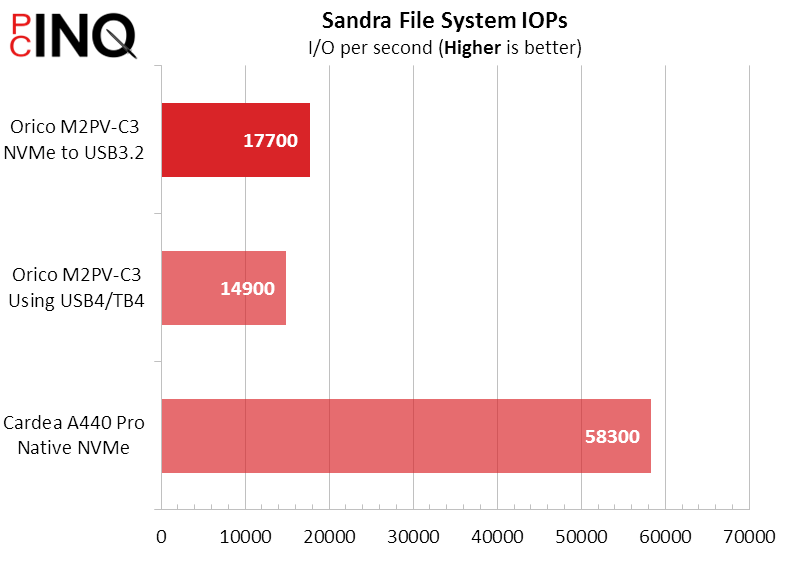
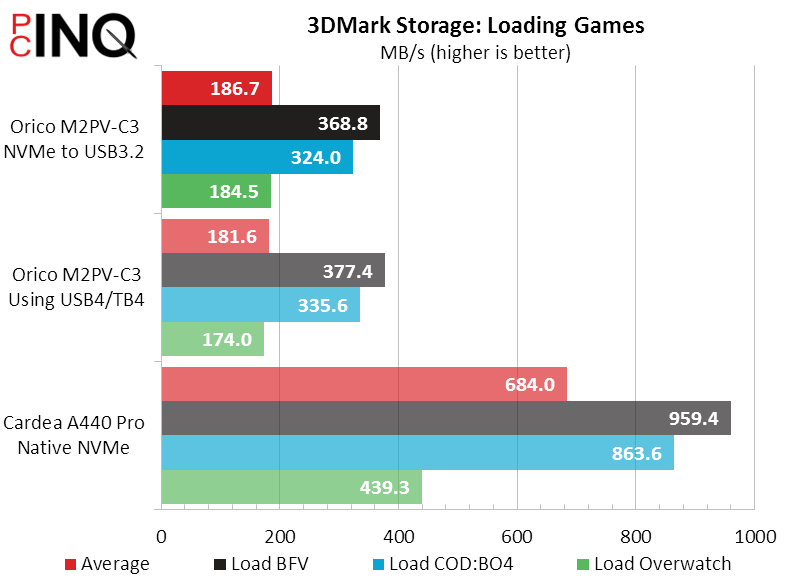
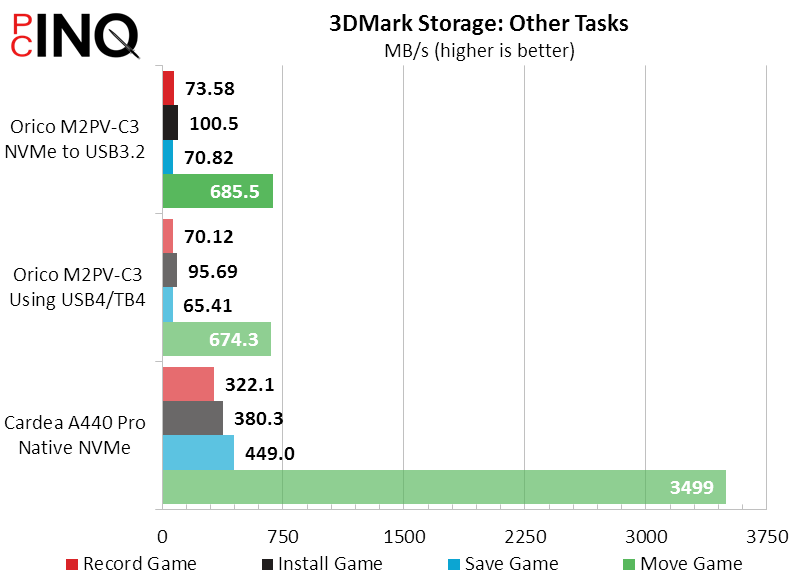
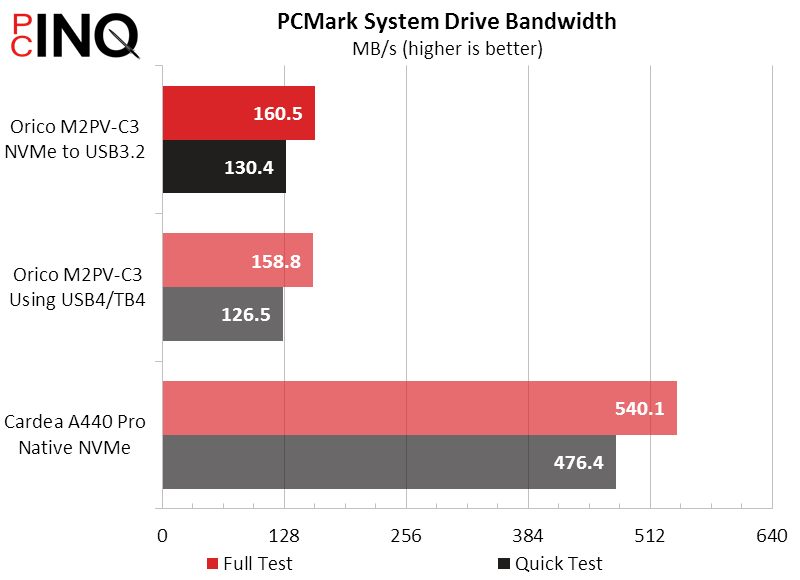
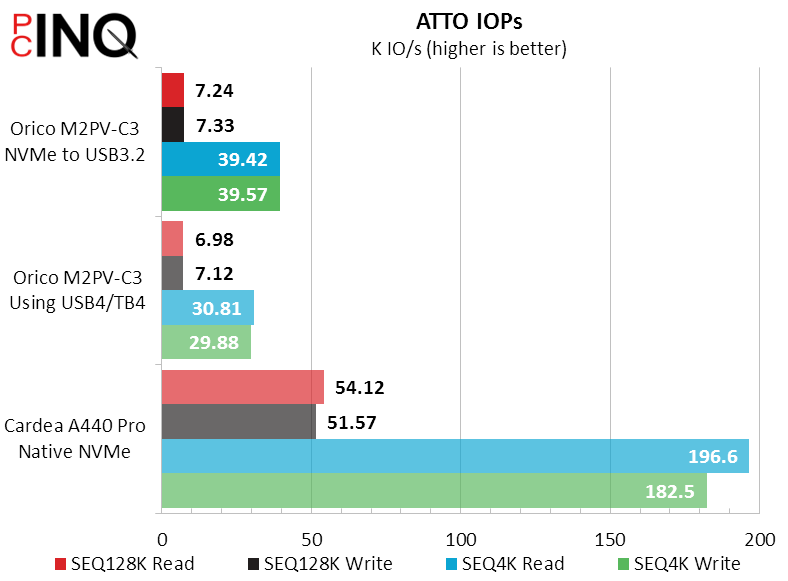
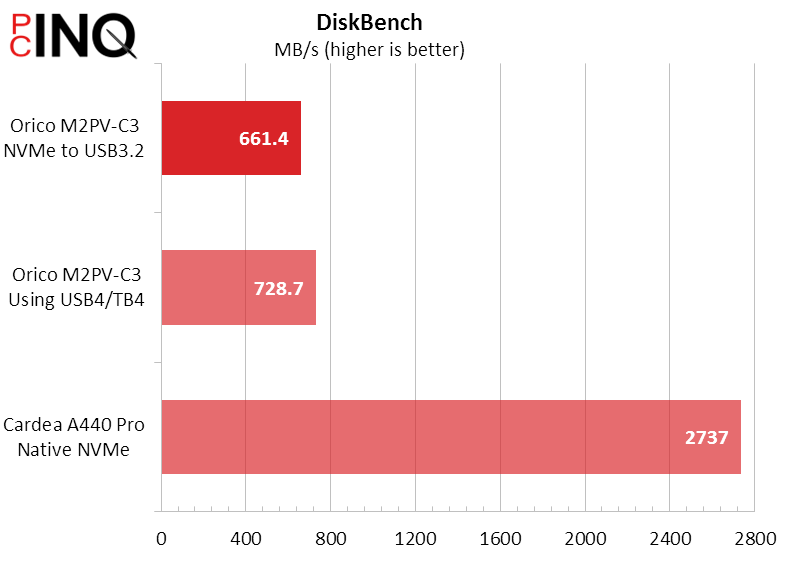
The numbers for all of our remaining tests follow the same theme: Orico’s M2PV-C3 gives our drive the full performance of USB 3.2 Gen2 and nothing more, with our motherboard’s shorter pathway Gen 2 Type A ports taking a slight latency lead over the longer Gen2x2 Type-C pathway. Feel free to click any images that you need to see in more detail: We’re moving on to our conclusion.


Conclusion: Premiere Performance For A Pauper’s Pittance
Orico’s M2PV-C3 NVMe drive enclosure performs right up to the limits of its 10Gb/s interface while being priced below $20, and even includes a well-functioning heat sink and thermal pad to make its tight confines survivable for high-end PCIe drives. What this means for most users is that they can pull the NVMe drive out of their old system and take the data with them, even if that system is already down from the failure of a different part. We were even able to image a loaded drive to another system using third-party software (Acronis True Image) and make that system bootable. That is to say, the M2PV-C3 does everything you’d expect it to, with no disappointments.
| Orico M2PV-C3 | |
| Pros | Cons |
| Unbeatable bandwidth Excellent thermals Unbelievably inexpensive | Only supports NVMe (PCIe) SSDs Installation guide uses indiscernible images |
| The Verdict | |
| For those whose entire M.2 collection is PCIe-based, the M2PV-C3 offers unbeatable performance at an unparalleled price. | |
Get it at Amazon
(click for availability)
While we normally reserve our top award for a product that beat several other tested products, the Orico M2PV-C3 already reaches the limit its USB3.2 Gen2 interface without leaving room for a future USB 3.2 Gen2 product to beat it.
